Wednesday, October 18, 2006

The Mystery Behind Color Spaces: Adobe RGB vs. sRGB

Intro
Talk about frustration. I first learned the significance of using color spaces the hard way - lots of bad prints. The worst part of it all was that the local photo lab I was using at the time didn't either recognize and/or understand what the problem was. They blamed the problem on monitor calibration. That wasn't the problem though.

See, when I took my digital files in on a disc or uploaded them to the store, they looked washed out and dull - nothing at all like the brilliant colors I saw on my monitor. So, I changed photo labs - same problem. Then, one day, I found the answer - I was submitting my prints in Adobe RGB color space rather the sRGB colorspace. After I switched to using sRGB exclusively I never got the washed out look on my prints again.

What is a Color Space?
I'll admit, I don't understand all the technical bits of what a color space is. If you're into that kind of thing and want to know more, I'd say have a look at Wikipedia's entry on color space. That said, if you think you can put the explanation into a short paragraph of plain english that I can understand, please post it for everyone's benefit.

I'll try to explain how I see this color space concept. There's a lot of colors in the world around us. My camera sees a lot of them, but not all. Depending on the color space that I choose (either in camera or in my editing software) I'll have more or less of these colors to display. sRGB is the standard set of colors that are used on the internet. You can thank Microsoft and HP for this. There's only so many different values of Red, Green, and Blues (and combinations thereof) that we get on websites - because sRGB is the standard and that's what web browsers use to see color. I suppose the simplest way to say it is that a color space is a defined set or range of colors.

About the Adobe RGB Color Space
Simply put, Adobe RGB has a bigger range of colors that sRGB. Adobe RGB was designed and implemented by (no surprise here) Adobe Systems, Inc. It was designed to help you get more color out of your inkjet printers that use a much bigger color space than sRGB. Particularly, Adobe RGB consists of a much wider range of greens and cyans (green-blue). So, we're now clear on the fact that Adobe RGB gives photographers more color to work with. Sounds like a no brainer. Let's go on to sRGB though.

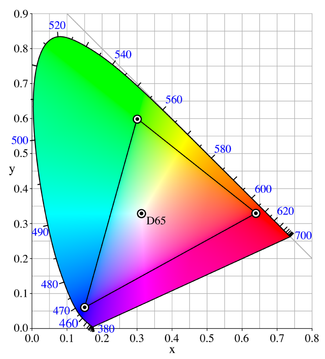
What Adobe RGB color space looks like:


About the sRGB Color Space
sRGB, as noted above, gives us a smaller range of colors than Adobe RGB; however, don't forget that it is the Internet standard (thanks Microsoft and HP). If you're looking at pictures on the web via your web browser and they look nice and colorful, then you can bet it's in sRGB color space.

What sRGB color space looks like:


More importantly, perhaps, is the fact that sRGB is what most photo labs use today. You name it, Wal-Mart, Walgreens, Wolf Camera, Ritz, and Target all use the sRGB color space to print your photos. Online labs like Kodak, York, and Snapfish, among others use the sRGB color space. Even labs that market themselves as "pro" labs such as Mpix or Myphotopipe (which I use and love) use the sRGB color space to process your prints.

Which One Should I Use?
It depends. This isn't too hard to figure out though.

If you print your own photos and you want every ounce of color that you get out of your photo, then learn to use Adobe RGB. I can't really tell you all that you need to know. Take a look at some of the resources that I've linked to in this post. Feel free to educate the rest of us on it if you know how to do it. Note that there are a few photo labs that will accomodate the Adobe RGB color space. Consider Printroom.com, for example. Printroom will accept whatever color space you send them, including Adobe RGB. They don't say that they'll print your Adobe RGB color space but they will "use the color information in your image file to convert it to the color space of the printer used to print the particular size-paper combination specified in the order. As a result, the images are printed exactly how you see them on your calibrated monitor in a "color aware" program like Adobe Photoshop." That's better service than you get from most online labs. If anyone is aware of other labs that accomodate Adobe RGB, please let me know.

If, like me, you take your photos, make a couple of edits here and there and either upload them onto the web at a place like SmugMug or print them out locally or online at a site like Myphotopipe.com, then you now know that you should be using sRGB from start to finish. Likewise, if you go the path of Adobe RGB, you'll need to convert those images to sRGB before you decide to upload and share them on the web.

Additional Sources to Learn More
sRGB vs. Adobe RGB from Cambridge in Colour
Dry Creek Photo: Introduction to Color Spaces
Color Space Fundamentals
Wikipedia - Adobe RGB
Wikipedia - sRGB
Adobe.com - Adobe RGB
Nature Photographers Online Magazine: Beyond Adobe RGB
Microsoft: Color Spaces and You

Labels: , , , , , , , , , , , , , , , ,

Sunday, October 08, 2006

RAW vs. JPEG

I'm going to address a debate that there is no clear answer to . . . actually, there is an answer: "It depends."

Ask a handful of photographers which file format you should shoot with and you'll get some strong opinions on both sides of the debate. Each side has some good points. The problem with the debate is that some folks with strong opinions believe there is only one way - JPEG or RAW. I tend to think that this depends on each photographer's particular circumstances.

First things first though. Let's talk a little bit about the basics of a RAW or JPEG image.

The JPEG Image
If you don't know what kind of file that the images you take are, then chances are you're shooting in JPEG format. Why? It's the easiest to work with - you would certainly be aware of a RAW file if you were shooting it. By easiest, I mean you press the shutter button, remove the memory card from your camera, insert it in your computer, and upload, email, or print away.

For those of you that are interested in the technical side, consider the explanation provided at prepressue.com:
JPEG is a lossy compression algorithm that has been conceived to reduce the file size of natural, photographic-like true-colour images as much as possible without affecting the quality of the image as experienced by the human sensory engine. We perceive small changes in brightness more readily than we do small changes in colour. It is this aspect of our perception that JPEG compression exploits in an effort to reduce the file size. Read more . . .

Also consider the compression issues pointed out in this Wikipedia entry.

The RAW Image
A RAW image file contains minimally processed data from the image sensor of a digital camera. Raw files are so named because they are not yet processed and ready to use with a bitmap graphics editor, printed, or displayed by a typical web browser. The image must be processed and converted to an RGB format such as TIFF or JPEG before it can be manipulated. Read more . . .

This means you can't take a RAW image and immediately put it in to Photoshop without some in-between processing. You are basically developing a digital negative.

The Arguments for and Against
Some say RAW is a superior format because you can do more with post-processing. Others say that if you learn to make a proper exposure the first time then you should need to do much, if any, post-processing. And some swear by JPEGs because of the volume of shots they take (e.g., event photographers). I think that what everyone means in their arguments for or against a particular format is that their format of choice works for them because of their particular needs. This is why I say, "It depends."

Take Killboy for example. For those of you who don't know who Killboy is, he shoots motorcycles almost every day of the week at a place called Deals Gap (a.k.a. Tail of the Dragon). People come from all over the country just to ride this section of road on the Tennessee/North Carolina border. Make one pass through the 318 curves in just 11 miles and you'll see why. Killboy takes thousands, sometimes tens of thousands, of shots each week. Just think for a moment how you would manage shooting RAW and posting processing 10,000 pictures in one week and still have time to do the same thing the next week. (I went to a mountain bike race 4 months ago and took 1,000 RAW images. I'm about halfway through post-processing now.) Killboy, along with other event photographers, shoot JPEGs because their business model requires it. For them, shooting RAW is logistically impossible.

What if you're doing a landscape photo that includes the sky or a portrait the uses the sky as part of your background?
The RAW file format usually provides considerably more "dynamic range" than a JPEG file, depending on how the camera creates its JPEG. Dynamic range refers to the range of light to dark which can be captured by a camera before becoming completely white or black, respectively. Since the raw color data has not been converted into logarithmic values using curves (see overview), the exposure of a RAW file can be adjusted slightly--after the photo has been taken. Exposure compensation can correct for metering errors, or can help bring out lost shadow or highlight detail. Read more & view example . . .
You can see the benefits of shooting RAW here pretty clearly I think.

I've talked quite a bit about post-processing. When it comes to RAW files, your options are continually expanding. There are several vendors that make RAW conversion and editing programs now. Let's take a brief look at what they have to offer:

Adobe Lightroom (currently in beta testing) - Free (beta version only)
Lightroom is my personal favorite RAW file editor. I like the layout, controls, and depth of the program. It runs fine on my iMac G5. It's easy to batch process or convert to JPEG or TIFF. What little Photoshop integration there is functions just fine. As a matter of fact, I use Photoshop a lot less since I started using Lightroom. It's currently in Beta 4 for the Mac. I'm so attached to it that I'll have to buy it the day it comes out. Lightroom IS my workflow. Read more about Lightroom . . .

Adobe Camera RAW - Included with current Adobe Photoshop programs
Adobe Camera Raw is the staple RAW editor for many Photoshop users. To me, it seems clunky and inefficient as a browser/viewer for RAW files. If you bought a version of Photoshop recently, it came with it. If not, you can likely get it for free from Adobe.com. Don't take my word alone, it's just not my cup of tea. Read more about Adobe ACR . . .

Apple Aperture - $270
Apple Aperture? What can I say? It's pretty. It works. And lots of people love it. My exposure to it has been limited because it won't run on my iMac G5. You need a killer video card to even think about installing this program. Also, it's only for Macs. Window's users can move along now.

What little that I've done with Aperture hasn't really sold me on it. When I upgrade to the next gen Macs, I'll probably stick with Lightroom. Aperture just seems a little to "pretty" to me. I prefer the simple presentation that Lightroom has over Aperture. Aperture just seems like it is trying to do too much. That said, if you're a Mac user and you like iPhoto, Aperture may be what you're looking for. It's like iPhoto on steriods, lots of steroids. Just make sure you've got the hardware to put it to use when you buy Aperture. Read more about Aperture . . .

Apple iPhoto - included w/ all crrent Macs
Apple added support for RAW files in iPhoto 5. When you make edits (and we're talking basic edits), iPhoto gives you the option of saving your edits as a TIFF file. Not a bad little program, but it's still a little program. If you've got a Mac, you've got iPhoto. Give it a shot and see what you think.

Bibble Pro 4.0 - $130
I have absolutely no experience with Bibble Pro 4.0. What I will do is offer some quotes from others who have reviewed/used it:
The Good

It has lots of options and it really does a great job. The best feature I can think of is the “black and white” plug-in which can make the image really artistic and give it a professional touch. The fact that it supports most major cameras and RAW formats adds great value. Also, Bibble is the first independent application to support Nikon's encrypted white balance information.

The software runs perfectly on Windows, Mac and Linux (check on the system requirements)

The Bad

As always, I have a problem with the price of the product. I know that the guys put a lot of sweat in developing Bibble Pro, but the price seems a little high to me. But, if you really want best quality images, you've got to pay the price.

The Truth

Considering the alternatives on the market Bibble Pro represents a good option. I wish I didn't have to pay that much on the software, but the truth is that it is worth the money. It does a great job with your images and the results are really amazing.

However, I'm going to wait for a while to see what other products will show up before opening my wallet.

Bibble Pro 4.8 is definitely a good choice for processing the “raw” image files and giving them the professional twist we all dream of. Read more from Softpedia.com . . .

We are very pleased that Bibble is back and think it is a good alternative to C1 and Adobe Camera Raw.

Workflow: In terms of workflow B4 is in the same class as C1 and at this time more productive than Camera Raw (mainly due to the lack of integration between the PS file browser and ACR).

Image Quality: B4, C1 and ACR all produce excellent image quality. We are sure there will be strong debates which one is best. In the end it will be very subjective as they are mainly different and not so much better or worse. Read more from OutbackPhoto.com . . .

Canon Digital Photo Professional - Included w/ current Canon DSLRs
When I'm working on my Windows laptop I generally use Canon DPP. It's not nearly as smooth as Lightroom but it usually handles any minor editing tasks that just can't wait until I get home. If you've got a Canon DSLR, then you've probably got this installed on your computer already. Open it up and see if you like it. Read more about Canon DPP . . .

LightZone - $100-150 (public beta version 2.0 currently available)
Never used it. It looks pretty cool though. Perhaps I'll give it a try. In the mean time:
LightZone is a simple yet powerful image editor. LightZone is easy to learn and let's you focus on your images. We will follow the development of this editor very closely because we see a great potential using LightZone.

* LightZone provides right now the easiest way to learn and use a layer based workflow (which we recommend for some years in our e-books)
* For advanced users LightZone provides a powerful photographic tool to optimize photos.
* Be aware that LightZone works differently than other editors. This will require some time to master. Try to experiment with selective operations in regions because here LZ can make a difference. Read more from OutbackPhoto.com . . .
Macworld notes:
Pros: Simulates analog photographic techniques; powerful built-in image browser; true non-destructive editing; powerful rendering engine eliminates the need to store multiple copies of an image; excellent blur, sharpen, and saturation tools; takes up only about 10MB of disk space.

Cons: Lacks important retouching tools; region selection tools need refinement; regions that bleed to the edge of the image area are tricky to select, slow performance when multiple regions and modification tools are active; some important tools are accessible only through option- and control-click. Read the rest of the Macworld article . . .
Picasa - Free
Picasa is more like a great photo organizer than it is a photo editor. It does have some features to fix photo mistakes. The greatest feature of this product is its organizing capabilities. It is also one of the easiest to use programs we’ve reviewed. The screens are simple, friendly and intuitive. There are also some limited ways to share your photos including a unique online sharing method called "Hello." Read more about Picasa . . .


These are just a handful of RAW editing programs available. If you've got a DSLR, chances are you also have a proprietary editing program that is unique to your camera's RAW format (e.g., Nikon uses the .NEF format; Canon uses the .CR2 format). I encourage you to shop around for what suits your needs in the RAW editing department.

So, What Should I Use?
Simple. You should use what works best for you.

If you want to have total control over what the final image looks like, then shoot RAW.

If you take lots of photos, don't have time to spend time post-processing your shots, or you simply want to take what you get, then shoot JPEG.

If you don't know what RAW has to offer, then give it a try. You may never go back to shooting JPEGs. I know I haven't. I'm a hobbyist at best and I'll never shoot another JPEG if I can keep from it. I might have pictures sitting around untouched for a few months, but I'm unwilling to give up that amount of control to my camera's processor. Granted, I don't do it for a living and never will.

Thanks for reading. If you have any questions or anything to add, I'd be happy to engage in a discussion or update the post.

Labels: , , , , , , , , , , , , , , , , , ,

Wednesday, October 04, 2006

How Do I Get Better?


I see a lot of folks on photography forums or letters written in to photo magazines asking where they should start. It seems like I see roughly the same question every day. Lots of times folks know how to point and shoot with their digital camera but don't necessarily understand what it takes to make a good photograph. I, by no means, pretend to be a professional photographer or an expert at photography. I'm learning though, and I think I'm getting better.

Learning photography should not be all trial-and-error. Granted that trial-and-error plays a role in the learning process; however, I think most photographers would agree that there is a fundamental level of knowledge necessary to gain significant knowledge and experience through the trial-and-error process.

I'd like to take a moment to share my thoughts on a few books that I've referred to previously, which I think would be excellent sources for those wishing to take the next step in photography from the casual point-and-shooter to the serious amateur/hobbyist.

Understanding Exposure by Bryan Peterson
Bryan Peterson is an excellent teacher. He's great at breaking down intimidating concepts for the novice and explaining them on your level. The book breaks up exposure into the three fundamental elements that go into properly exposing a photo: aperture; shutter speed; and ISO (or, film speed). This is the book to buy for those who have only ever used a point and shoot camera or who always shoot their SLR on full auto mode (the little green rectangle setting). Simply reading this book will make you a better photographer overnight if you fall into these categories.

If you've got a basic handle on these concepts but not sure you really grasp the significance of one or all of them then you should consider adding this book to your library as well. Aside from the technical basics, Bryan teaches you how to look at a scene and capture a creative photo in addition to a properly exposed one.

Before you buy another camera, lens, flash, or any other gear, buy this book if you're wondering what you should spend you cash on. It'll be the best $15 you ever spend on your photography gear.

Understanding Digital Photography by Bryan Peterson
I really consider this book an update to Understanding Exposure. If you've never shot film, don't care to ever mess with film, or would like to understand the differences between digital and film technology on a more basic level then consider this book. It teaches all the basics I've pointed out in my comments on Understanding Exposure above and adds the digital flavor to the mix. I wouldn't be suprised if the two books are consolidated in a future version. Either way, they're both great books and you won't go wrong with your purchase of either or both - I've got both ;)

The Photoshop CS2 Book for Digital Photographers by Scott Kelby
Scott Kelby is simply the Man when it comes to Photoshop. Not only does he know the insides and outs, he also knows who to teach it. Kelby is the Editor in Chief of Photoshop User magazine and the President of the National Association of Photoshop Professionals. There are a ton of uses for Photoshop and a ton of books explaining how to use it. There aren't that many books that are dedicated to photographer's needs. Kelby's Photoshop for Digital Photographers series responds to this niche.

Chances are, if you have a copy of any Photoshop version, that Kelby has a book on the particular version you've got. If you've got Photoshop and a digital camera, you need Kelby's book. He gives you step by step instructions for the particular actions that you're trying to do. Additionally, unlike other books that try to do the same, he gives you actual values to use for the actions. This gives you a great idea of the starting points for applying blurs, unsharp mask, grayscale, and the likes. When I'm working on my computer, I've got this book on my desk.

These books are permanent fixtures in my library and I still frequently refer to each of them. Your money will not be lost in the purchase of any or all of these books. There's plenty of knowledge in them to grow with you for some time to come. Don't take my word alone though. Check out the reviews on Amazon from the links above or elsewhere around the net.

Labels: , , , , , , , ,